.png)

Materials and Tools You’ll Need
Before getting started, gather your supplies.
Materials
-
Pressure treated boards (no longer toxic and used in organics)
-
Simpson 1-1/2" SD Connector screws
-
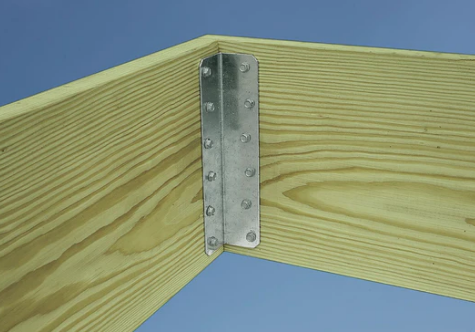
Simpson ML Angle Ties (save bed space over 4x4 posts)
-
Cardboard or landscape fabric (optional)
-
Soil and compost mix
Tools
-
Drill or impact driver
-
Tape measure
-
Level
-
Shovel
-
Digging fork
-
Rake
Step 1: Choose the Right Location
The location of your raised bed can make a huge difference in how successful your garden becomes.
Look for an area that:
-
Receives at least 6–8 hours of sunlight daily
-
Has good drainage
-
Is close to a water source
-
Has relatively level ground
Avoid placing beds directly under large trees because roots can compete for water and nutrients.
Step 2: Decide on the Size of Your Raised Bed
A common beginner size is 4 feet by 8 feet. This width allows you to comfortably reach the center from either side without stepping into the bed.
Recommended dimensions:
-
Width: 4 feet
-
Length: 6–8 feet
-
Depth: 10–18 inches
The deeper the bed, the more room plant roots will have to grow.
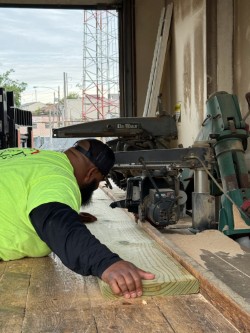
Step 3: Get Lumber Cut
At Beatty we can cut the boards to size.
For a standard 4×8 bed, you’ll typically need:
-
Two 8-foot boards
-
Two 4-foot boards
-
Four Angle Ties
The pressure treated wood can be end treated if cut, but using the angle ties guarantees good screw grab, even with some possible core decay.
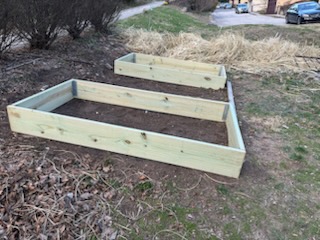
Step 4: Assemble the Frame
Lay the two long parallel boards flat, and attach the angle ties with the screws.
Stand each up and attach the end boards; a square or clamp can help (not necessary).
Repeat.
A few tips:
-
Beds can be stacked
-
If using multiple levels with long spans, tie plates can be used in the middle of the spans to prevent bowing, and help attaching the levels
-
Some people will pound in some sharpened pressure treated deck balusters on the sides of long spans to help prevent bowing, and attach with screws higher up.
Step 5: Prepare the Ground
Clear the area where the raised bed will sit by removing grass and weeds.
If the bed is shallow, some gardeners place cardboard before filling to help suppress future weeds naturally. The cardboard will break down over time while improving the soil underneath.
Otherwise, loosen with the digging fork the underlying soil to maximize root depth.
Use a rake or shovel to level the ground as much as possible before placing the frame.
Step 6: Position the Raised Bed
Move the completed frame into its final position.
Use a level to ensure the bed sits evenly on the ground. If your yard slopes slightly, you may need to dig out one side a bit.
For extra stability, some gardeners hammer stakes or rebar into the corners.
Step 7: Fill the Bed With Soil
One of the biggest benefits of raised beds is controlling your soil quality.
A simple raised bed soil mix includes:
-
60% topsoil
-
30% compost
-
10% aeration material like perlite or vermiculite
If your bed is especially deep, you can save money by filling the bottom portion with leaves, branches, or untreated wood scraps before adding soil on top.
Step 8: Water the Soil Thoroughly
Once the bed is filled, water it deeply.
The soil will settle during the first few days, so you may need to add a little more soil afterward.
This is also a good time to mix in additional compost or organic fertilizer if desired.
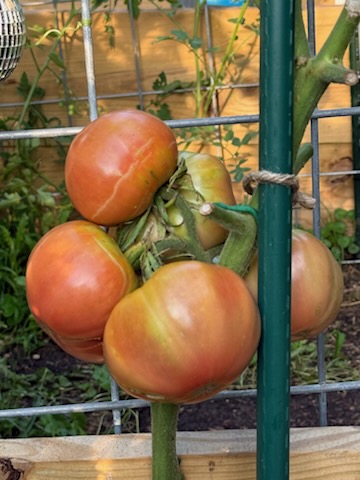
Step 9: Start Planting
Now comes the fun part: planting your garden.
Beginner-friendly plants for raised beds include:
-
Tomatoes
-
Lettuce
-
Basil
-
Peppers
-
Green beans
-
Radishes
After planting, add mulch such as straw or shredded leaves to help retain moisture and reduce weeds.
Common Raised Bed Gardening Mistakes to Avoid
Even simple projects can go wrong without proper planning. Here are a few common mistakes to avoid:
Making the Bed Too Wide
If you cannot comfortably reach the center, maintenance becomes difficult.
Using Poor Soil
Good soil is one of the most important investments in a productive garden.
Forgetting Drainage
Raised beds should drain freely to prevent root rot and soggy soil.
Final Thoughts
Building a raised garden bed is one of the best DIY projects for beginner gardeners. It’s affordable, customizable, and can dramatically improve your gardening success.
With a few boards, quality soil, and a sunny location, you can create a productive growing space that lasts for years. Whether you’re growing vegetables, herbs, or flowers, a raised bed provides a clean, organized, and efficient way to garden.
Come into Beatty and let us help you get all the materials you need to have a flourishing garden this summer.
Jun 1, 2026
Materials and Tools You’ll Need
Before getting started, gather your supplies.
Materials
-
Pressure treated boards (no longer toxic and used in organics)
-
Simpson 1-1/2" SD Connector screws
-
Simpson ML Angle Ties (save bed space over 4x4 posts)
-
Cardboard or landscape fabric (optional)
-
Soil and compost mix
Tools
-
Drill or impact driver
-
Tape measure
-
Level
-
Shovel
-
Digging fork
-
Rake
Step 1: Choose the Right Location
The location of your raised bed can make a huge difference in how successful your garden becomes.
Look for an area that:
-
Receives at least 6–8 hours of sunlight daily
-
Has good drainage
-
Is close to a water source
-
Has relatively level ground
Avoid placing beds directly under large trees because roots can compete for water and nutrients.
Step 2: Decide on the Size of Your Raised Bed
A common beginner size is 4 feet by 8 feet. This width allows you to comfortably reach the center from either side without stepping into the bed.
Recommended dimensions:
-
Width: 4 feet
-
Length: 6–8 feet
-
Depth: 10–18 inches
The deeper the bed, the more room plant roots will have to grow.
Step 3: Get Lumber Cut
At Beatty we can cut the boards to size.
For a standard 4×8 bed, you’ll typically need:
-
Two 8-foot boards
-
Two 4-foot boards
-
Four Angle Ties
The pressure treated wood can be end treated if cut, but using the angle ties guarantees good screw grab, even with some possible core decay.
Step 4: Assemble the Frame
Lay the two long parallel boards flat, and attach the angle ties with the screws.
Stand each up and attach the end boards; a square or clamp can help (not necessary).
Repeat.
A few tips:
-
Beds can be stacked
-
If using multiple levels with long spans, tie plates can be used in the middle of the spans to prevent bowing, and help attaching the levels
-
Some people will pound in some sharpened pressure treated deck balusters on the sides of long spans to help prevent bowing, and attach with screws higher up.
Step 5: Prepare the Ground
Clear the area where the raised bed will sit by removing grass and weeds.
If the bed is shallow, some gardeners place cardboard before filling to help suppress future weeds naturally. The cardboard will break down over time while improving the soil underneath.
Otherwise, loosen with the digging fork the underlying soil to maximize root depth.
Use a rake or shovel to level the ground as much as possible before placing the frame.
Step 6: Position the Raised Bed
Move the completed frame into its final position.
Use a level to ensure the bed sits evenly on the ground. If your yard slopes slightly, you may need to dig out one side a bit.
For extra stability, some gardeners hammer stakes or rebar into the corners.
Step 7: Fill the Bed With Soil
One of the biggest benefits of raised beds is controlling your soil quality.
A simple raised bed soil mix includes:
-
60% topsoil
-
30% compost
-
10% aeration material like perlite or vermiculite
If your bed is especially deep, you can save money by filling the bottom portion with leaves, branches, or untreated wood scraps before adding soil on top.
Step 8: Water the Soil Thoroughly
Once the bed is filled, water it deeply.
The soil will settle during the first few days, so you may need to add a little more soil afterward.
This is also a good time to mix in additional compost or organic fertilizer if desired.
Step 9: Start Planting
Now comes the fun part: planting your garden.
Beginner-friendly plants for raised beds include:
-
Tomatoes
-
Lettuce
-
Basil
-
Peppers
-
Green beans
-
Radishes
After planting, add mulch such as straw or shredded leaves to help retain moisture and reduce weeds.
Common Raised Bed Gardening Mistakes to Avoid
Even simple projects can go wrong without proper planning. Here are a few common mistakes to avoid:
Making the Bed Too Wide
If you cannot comfortably reach the center, maintenance becomes difficult.
Using Poor Soil
Good soil is one of the most important investments in a productive garden.
Forgetting Drainage
Raised beds should drain freely to prevent root rot and soggy soil.
Final Thoughts
Building a raised garden bed is one of the best DIY projects for beginner gardeners. It’s affordable, customizable, and can dramatically improve your gardening success.
With a few boards, quality soil, and a sunny location, you can create a productive growing space that lasts for years. Whether you’re growing vegetables, herbs, or flowers, a raised bed provides a clean, organized, and efficient way to garden.
Come into Beatty and let us help you get all the materials you need to have a flourishing garden this summer.